How to Build a Custom Water Cooled Gaming PC
Disassembling Existing Components
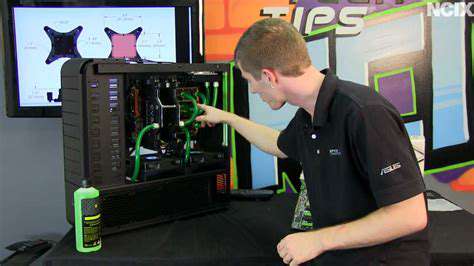
When preparing to assemble your custom water-cooling system, the first critical step involves carefully removing any existing components that will be replaced. This meticulous disassembly process lays the foundation for a smooth installation. Take time to properly disconnect and organize all cables, fans, and mounting hardware to prevent confusion during reassembly. Many experienced builders recommend documenting the original configuration through photographs or detailed notes - this reference proves invaluable if you need to restore the original setup later.
After removal, thoroughly clean each component, paying special attention to thermal paste residue and accumulated dust. This cleaning process directly impacts your new system's performance and longevity. Use isopropyl alcohol and lint-free cloths for best results, ensuring no contaminants remain that could affect cooling efficiency.
Preparing the Components
With the workspace cleared, carefully inspect all new water-cooling parts before installation. Verify that you have all necessary fittings, tubes, and hardware, checking each piece for manufacturing defects like scratches or imperfections. Following the manufacturer's instructions precisely ensures compatibility and proper function between components from different brands or product lines.
This preparation phase often determines the success of your build. Confirm that your selected pump, radiator, and water block are specifically designed for your CPU socket type and motherboard layout. Many builders create a mock assembly without coolant to test fit all components before final installation.
Mounting the Water Block
The water block installation requires particular attention to detail. Proper alignment and secure attachment are absolutely crucial for effective heat transfer from your CPU. Most manufacturers provide specific torque specifications for mounting screws - use a precision screwdriver to achieve the recommended tightness without over-torquing. Uneven pressure can lead to poor contact or even damage the CPU package.
Connecting the Components
When connecting the water block, pump, and radiator, ensure all fittings are properly seated and secured. The direction of coolant flow, typically marked by arrows on components, must be followed precisely for optimal thermal performance. Many builders prefer to temporarily power the pump (without coolant) to verify all connections are airtight before proceeding.
Testing and Verification
Before introducing coolant, conduct a thorough leak test using air pressure or distilled water. The paper towel method (wrapping connections with white paper towels) makes even small leaks immediately visible. Addressing leaks at this stage prevents catastrophic failures later. Once verified leak-free, fill the system slowly with your chosen coolant, carefully following the manufacturer's recommended procedure to avoid air pockets.
System Initialization and Monitoring
After filling, power on the system while monitoring pump operation and coolant flow. Use monitoring software to track temperatures during the initial hours of operation, watching for any unusual fluctuations. The first 24-48 hours are critical for identifying potential issues while the system stabilizes. Listen for unusual pump noises or gurgling sounds that might indicate air in the loop.
Testing and Optimizing Your Water Cooling System: Achieving Peak Performance
Understanding Your System's Components
Effective optimization begins with comprehensive knowledge of each component's specifications and how they interact. The radiator's heat dissipation capacity, pump's flow rate, and reservoir size must work in harmony. Imbalance between these elements creates performance bottlenecks that reduce cooling efficiency.
For example, pairing a high-TDP CPU with an undersized radiator will inevitably lead to thermal throttling, regardless of pump quality. Similarly, restrictive tubing or too many right-angle fittings can dramatically reduce flow rates. Documenting your component specifications helps troubleshoot performance issues and plan future upgrades.
Leak Detection and Prevention
Regular maintenance includes systematic leak checks. Inspect all fittings and seals monthly for signs of weeping or mineral deposits that indicate slow leaks. Many builders use UV-reactive coolant with a blacklight to make tiny leaks more visible. Preventive maintenance like replacing o-rings annually and checking tube flexibility can prevent most leaks before they occur.
Flow Rate and Pressure Monitoring
Installing a flow meter provides quantitative data about your loop's performance. Ideal flow rates typically fall between 0.5-1.0 gallons per minute for most systems. Sudden drops may indicate blockages or pump issues. Monitoring pressure changes helps identify developing problems like clogged water blocks before they cause overheating.
Temperature Monitoring and Adjustments
Advanced monitoring involves tracking multiple temperature points: coolant temperature at various loop locations, component temperatures, and ambient air temperature. This data reveals how efficiently heat moves through your system. For example, a large temperature differential between coolant entering and leaving the radiator suggests excellent heat transfer, while minimal difference may indicate insufficient radiator capacity.
Troubleshooting and Maintaining Your Custom Water-Cooled PC
Troubleshooting Common Issues
When encountering connectivity problems, methodically check each system component. Start with basic connections before investigating more complex issues. For performance problems, monitor temperatures under different loads to identify patterns that point to specific components.
Maintaining Data Integrity
Implement a 3-2-1 backup strategy: three copies of important data, on two different media, with one copy offsite. This approach provides robust protection against data loss from both hardware failures and physical disasters.
Optimizing Performance
Regular maintenance includes flushing the loop every 6-12 months to prevent buildup of particulates or biological growth. Use appropriate cleaning solutions for your specific components, as some materials require special care. After cleaning, perform new baseline performance tests to verify optimal operation.
Security Best Practices
Physical security is as important as digital security for custom water-cooled systems. Ensure all connections are secure to prevent accidental spills that could damage components. Use leak detection systems that automatically power down the system if moisture is detected.
User Experience Enhancements
Consider adding temperature-controlled RGB lighting that changes color based on coolant temperature. This provides both aesthetic appeal and functional monitoring, alerting you to potential cooling issues before they become serious problems.
Monitoring System Health
Advanced builders often implement secondary monitoring systems that don't rely on the main computer's operation. Dedicated hardware monitors can provide alerts even if the primary system crashes, helping prevent damage from overheating or pump failure.
Regular Updates and Maintenance
Create a maintenance calendar that schedules all necessary upkeep tasks throughout the year. This includes routine checks, coolant changes, and component inspections. Staying proactive with maintenance prevents most emergency repairs and extends the life of your water-cooling components.
Read more about How to Build a Custom Water Cooled Gaming PC
![What is the Internet of Things (IoT)? [Simple Explanation]](/static/images/25/2025-05/TheFutureofIoT3AOpportunitiesandChallenges.jpg)


![Top Apps for Learning to Cook Delicious Meals [2025]](/static/images/25/2025-05/AdvancedAppsforCulinaryEnthusiastsandProfessionals.jpg)


Hot Recommendations
- Review: The New [Specific Brand] Smart Lock Is It Secure?
- Best Budget Studio Monitors for Music Production
- Top Flight Simulation Peripherals (Joysticks, Throttles, etc.)
- Top Portable Scanners for Document Management On the Go
- Reviewing the Latest Smart Air Purifiers for Your Home
- Best Portable Photo Printers for Travelers and Memory Keepers
- The Future of Personal Transportation Beyond Cars (Hyperloop, eVTOL)
- Top Network Monitoring Tools [Free & Paid Options]
- Understanding the Tech Behind mRNA Vaccines [A Look Inside]
- Guide to Choosing the Right Gaming Chair for Ergonomics